


- Writing tools
- Nara
Nara Inksticks Nara Sumi
Delivering the scent of ancient times to present
Jet black Japanese ink made by highly skilled artisans
Description
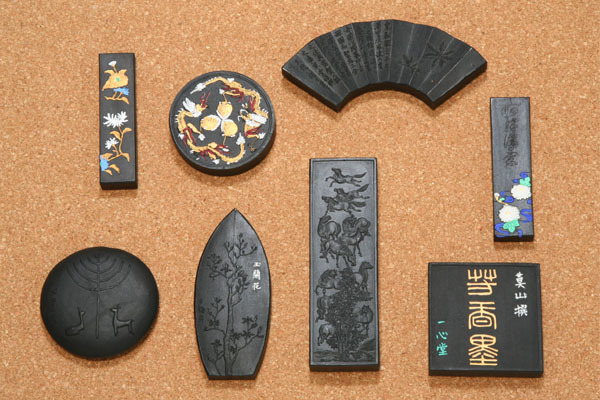
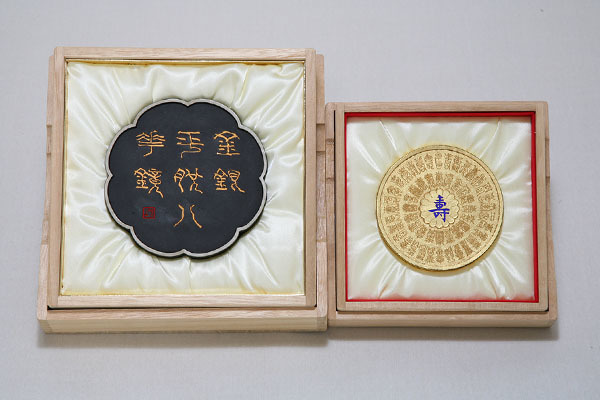
What is Nara Inksticks ?
Nara Inksticks, called Nara Sumi in Japanese, is Japanese ink (sumi) produced in Nara, Nara prefecture. It was the second sumi, following Suzuka Sumi of Mie prefecture, to be designated as a traditional craft.
There are two types of sumi; shoenboku, made by burning pine resin, and yuenboku, which is made by burning rapeseed, sesame, or paulownia oil. Nara Sumi is classified in the latter.
As the production of Nara Sumi requires delicate skills of the sumi artisans, machines cannot be used, and all procedures must be done by hand. The shaping of the sumi is done by hand, or a mold made of wood or loofa skin is used, to create beautiful forms unique to Nara Sumi.
History
According to Nihon Shoki (Chronicles of Japan) Volume 22, sumi was brought to Japan from China and Korea in the year 610.
The Buddhist priest Kukai went to Tang (current China) as a member of the envoy to Tang in 806 and brought back the manufacturing method of sumi together with a writing brush. He made sumi at Kofukuji Temple, and this is said to be the beginning of Nara Sumi. Sumi was produced all over Japan during the Heian period (794-1185), but production decreased as time went by. Even then, sumi was continued to be produced mainly in temples and shrines of Nara.
Especially at Kofukuji Temple, which was a temple built to pray for the glory of the Fujiwara clan, all of the sumi used for writing the Buddhist Scripture or copying the sutra was produced at Kofukuji Temple. Many sumi manufacturers were gathered at Kofukuji Temple, and quite a large amount of sumi was produced.
Nara Sumi also became well known in and after the reign of Nobunaga ODA and Hideyoshi TOYOTOMI. Sumi was originally produced by request of temples and shrines, but after Nobunaga ODA unified the country, the power of temples and shrines became weak, and additionally, the new policy for free markets and open guilds helped the sumi artisans start their own sumi shops, changing the whole situation. Between 1573 and 1593, Dochin MATSUI, the first owner of Kobaien, a sumi manufacturer in Nara, established the sumi business, and by the mid Edo period, there were approximately forty sumi shops around the old town of Nara.
There were times when the sumi industry declined, but high quality sumi continues to be produced today, and about ninety percent of the sumi produced nationwide is made in Nara.
Production Process
- 1. Melting animal glue
Animal glue is melted in a water bath. Animal glue is placed in a container with water and is placed in a pot of hot boiling water to be melted.
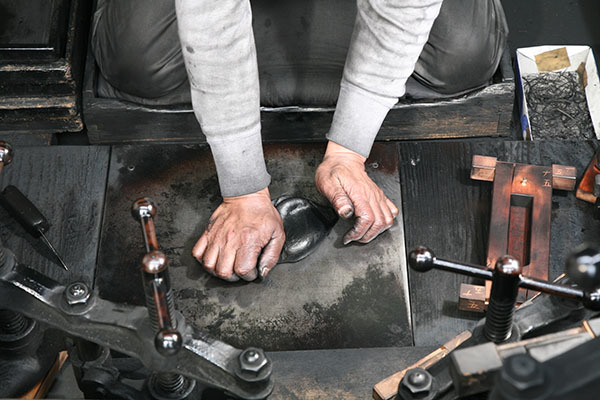
- 2. Kneading
When the animal glue is melted, it is kneaded together with soot. Soot, animal glue liquid and perfume ingredients are put in an agitator to be kneaded roughly. When it becomes like a soft rice cake, it is placed on a kneading board to be kneaded by hand, and final kneading is done by foot.
- 3. Molding
The kneaded sumi ball is torn into small pieces and each piece is weighed on a scale. The weighed sumi balls are further kneaded and then placed in a mold and are pressed.
- 4. Drying
Charcoal is placed on a sheet of paper, and the molded sumi are placed on it. Another sheet of paper is spread over the sumi pieces and charcoal is placed on the paper.
As the surface of sumi dries and cracks easily, the charcoal is replaced little by little with dry charcoal, and the sumi pieces are dried slowly. This takes about seven to twenty days.
When the sumi becomes hard to a certain extent, they are wrapped with straw and are hung from the ceiling to be dried further for another thirty to ninety days.
- 5. Washing and polishing
When the sumi is completely dry, any charcoal or straw left from the drying process is washed off with water and a coating is applied.
There are two ways to finish the surface of sumi; a matte finish and a glossy finish where clams are used for polishing.
- 6. Drying again
The polished sumi is placed on wooden frames and the frames are stacked in a drying room for about a month.
- 7. Finishing
The letters and designs on the surface of the sumi are colored. They are then put in boxes, wrapped and are completed.
Other Writing tools
- Kumano Brushes
- Ogatsu Inkstones
- Akama Inkstones
- Unshu Abacus
- Banshu Abacus
- Nara Brushes
- Suzuka Inksticks
- Toyohashi Brushes
- Kawajiri Brushes
- Nara Inksticks