


- Metal works
- Iwate
Nambu Ironware Nambu Tekki
A 900-year history of craftsmanship
in Japan's northern nature
Description
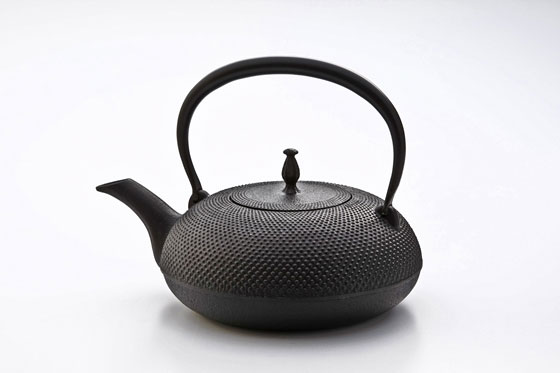
What is Nambu Ironware ?
Nambu Ironware (called Nambu Tekki in Japanese) is a form of metalwork produced in Morioka City and Mizusawa, Oshu City in Iwate prefecture. It is a traditional craft that was first created in the middle of the Edo period (1603-1868). The name "Nambu Ironware" comes from the fact that it was first produced in the Nambu domain during the Edo period. Nambu ironware is rust-resistant, long-lasting, well-insulated, and provides a uniform circulation of heat. The exterior of the kettle has a bumpy textured pattern called arare or hailstone which is often used in Nambu ironware to help increase the surface area of iron kettles. The iron kettles that are representative of Nambu ironware will vary individually because each artisan is free to create any arare pattern they like. Iron kettles are the most popular Nambu ironware item, but there are also Nambu ironware saucepans, wind chimes, and accessories.
History

Nambu ironware has its roots in the production of pots for tea ceremonies in the Nambu domain (Iwate prefecture) in the mid 17th century. Morioka has long been an area suited for the foundry industry due to an abundance of iron resources so casters were invited to the Nambu domain in order to encourage casting production. In 1659, a feudal lord who wanted to promote the tea ceremony ordered teakettle caster Nizaemon Koizumi to move from Kyoto to the area around the lord's castle in Nambu in order to start producing kettles. The Koizumi family first cast all the pots used for tea ceremonies in the Nambu domain at that time, as well as gifts for the emperor. Tea-casting techniques and control of the Koizumi firm was passed from father to son. An iron kettle smaller than the typical tea ceremony kettle was developed under the helm of third-generation teakettle caster Nizaemon Koizumi. It was called the "Nambu iron kettle" and came to be widely appreciated as a tea utensil. Emperor Taisho, who ruled from 1912 to 1926, visited the Tohoku region in 1908 and had the eighth-generation Nizaemon Koizumi demonstrate the Nambu ironware production process for him. This event was covered in newspapers throughout Japan and led to an increase of Nambu ironware popularity. Today, all pieces produced in the Morioka and Mizusawa areas of Iwate prefecture are called Nambu ironware.
Production Process
- 1. Drawing
The first step in the production of Nambu ironware is to draw a rough draft.
As the dimensions and exterior of the tea kettle are decided, they are added to the sketch of the final shape.
Then a longitudinal section diagram is made from a casting pattern or replica of the final product.
The casting replica, necessary in order to produce the template mold, was made out of wood in the past but is currently made of iron. - 2. The mold Sand of different textures and clay are placed inside the mold and the casting replica is rotated to produce the iron casting mold. The sand starts out coarse and granular and then becomes very fine. Also this is a delicate step as the shape of the mold may collapse while the casting replica is rotating. Molds for the ears of the kettle where rings are attached to carry the kettle, the spout, and the handle on the lid are also made with clay at this stage.
- 3. Making the pattern
Once the mold has been produced, the design is applied before the sand dries out. At this point in the process, the arare design, a well known feature of Nambu ironware, is added. In order to make each design unique, the artisan manually stamps in the sand using a writing brush or a cloth pad.
When the template is dry, it is baked in a charcoal fire at a temperature of around 900 to 1300℃ (about 1652 to 2372℉). The time required for template mold baking depends on the designs.
A brush or a spatula is then used to fix any items that have cracked while baking. - 4. Making the internal mold
Using templates that have designs pressed into them, the core is shaped using the same method as the second process of template production, and the templates are baked accordingly.
Baked sand, river sand, clay wash, etc. are mixed together and the combination necessary for the core is produced.
The mold is placed on the potter’s wheel and the core produced in the previous step is pressed against the inside to create the form of a bowl. The external body template and bottom template are produced.
The templates are dried and the moisture contained in the core is extracted. - 5. Drying/Baking the mold After the mold has dried, it bakes in a charcoal fire at a temperature of around 800 to 1000℃ (about 1472 to 1832℉). If any cracks occur while baking, the mold is repaired using a brush or another similar tool. The mold is complete once a runner to pour in the melted iron has been formed at the bottom template and the lid.
- 6. Mold assembly
The core is inserted into the external body template with the template facing the bottom. Iron parts called chaplets are placed in two or three locations inside the core in order to prevent it from floating when melted iron is poured inside.
The bottom template is also aligned with the core from the top. - 7. Casting in the mold Once the template has been assembled, it is finally time to start casting in the mold. "Casting in the mold" is the process of melting iron and pouring it into the mold. Cast iron is not poured into the mold directly, but instead scooped and poured into the mold with a ladle called a toribe.
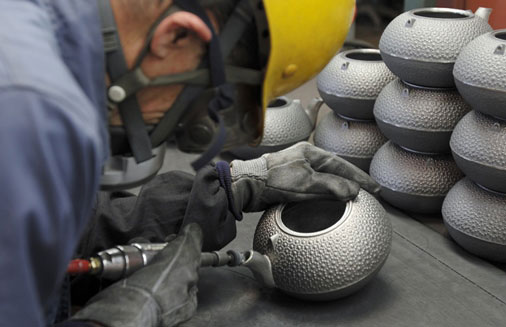
- 8. Finishing touches
Once the iron has cooled and hardened, the mold and the core are removed. At this stage, there are burrs (a substance that hardens after the emitted hot water has cleared), so this must be cleaned off.
After the burrs have been entirely removed, the whole piece is polished with an implement such as a wire brush.
Then, it is finally time for baking. Iron kettles are baked at around 800 to 1000℃ (about 1472 to 1832℉). The purpose of baking is to make iron kettles rust-resistant by creating a layer of oxide film. - 9. Polishing and coloring After the kettle is baked and checked for any leaks, the next step is to polish and color. The kiln is heated to around 200 to 300℃ (around 392 to 572℉) by charcoal fire, and lacquer is applied with a paintbrush. Once the lacquer has been scorched, a traditional coloring liquid called ohaguro, which translates to teeth blackening liquid, is painted on top of the lacquer base. The teeth blackening liquid is made from a combination of iron rust and tea. After the liquid has been applied, the coloring process is complete.
- 10. Bail handle production Bail handles are produced by specialist artisans. The Nambu ironware is complete when a bail handle is attached to the iron kettle.
Representative Manufacturers
Iwachu atelier
At Iwachu atelier, we have a gallery where visitors can enjoy many Nambu ironware items and also a factory where you can see how pig iron items are created.
You can buy pig iron items as well as kitchen utensils, different kind of ornaments and many other products in our shop too.
-
Founded6/1902
-
ClosedTuesdays, New Year's holidays
-
DirectorYayoi Iwashimizu
-
Business Hours10:00am to 5:00pm
-
Address
-
Website
-
Tel.+81-19-635-2501
Itchu-do atelier
Itchu-do is a new brand of Japanese crafts that launched in 2009.
We create easy-to-use nambu ironware for everyday life. Our sophisticated universal items fit well in any lifestyle, fashion and trend.
-
Founded2009
-
ClosedSaturday and Sunday
-
DirectorYasuhiro SATO
-
Business Hours9am to 5.30pm
-
Address
-
Website
-
Tel.+81-19-681-0560
Facility Information
Iwachu Tekkikan
-
Address
-
Tel.+81-19-635-2505
-
ClosedTuesdays, New Year's holidays
-
Business Hours10:00am to 5:00pm
-
AccessApproximately 5 km from Morioka Station on the JR Tohoku Shinkansen and Tohoku Main Line.
-
Website
Nambu Ironware Related Artists
- You will be redirected to the artist's page on the Gallery Japan website
See list of artworks related to Nambu Ironware ![]()
Other Metal works
- Nambu Ironware
- Takaoka Copperware
- Yamagata Cast Iron
- Sakai Forged Blades
- Tokyo Silverwork
- Echizen Forged Blades
- Osaka Naniwa Pewterware
- Tosa Forged Blades
- Tsubame Hand-Hammered Copperware
- Shinshu Forged Blades
- Banshu Miki Forged Blades
- Higo Inlays
- Echigo Sanjo Forged Blades
- Echigo Yoita Forged Blades
- Chiba Artisan Tools
- Tokyo Antimony Crafts