


- Dyed textiles
- Kyoto
Kyo Fine Pattern Dyed Textiles Kyo Komon
Luxury and elegance
in fine traditional textiles
Description
What is Kyo Fine Pattern Dyed Textiles ?
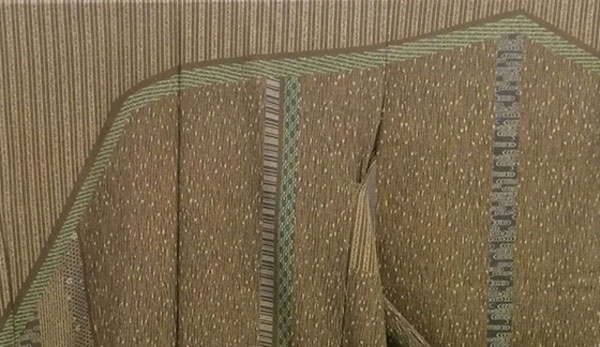
Kyo Komon are fine-patterned textiles produced in Kyoto prefecture. Kyoto, a historical center of dyed textiles, is renowned for its superb fabrics resulting from exceptional dyeing and stencil making. This craft has beautifully elegant colored patterns and can be traced back to about 1200 years ago, when the stencils for dyeing were first made. Originally, the term komon specifically referred to the monochromatic stencil-dyed fine-patterns on kamishimo or the samurai ceremonial dress of the Edo period (1603-1868). During this period, hakama (wide-legged pleated trousers) made with komon-dyed linen was standard formalwear for samurai. Among the general public, especially merchants, a free, fashionable culture developed and stylish komon kimono came into fashion. The originally monochromatic komon blossomed into multi-colored designs with many variations. As Kyoto is known for two distinctive dyeing styles, Kyo Yuzen and Kyo Komon, they have influenced each other over time, and this helped Kyo Komon develop its own unique style. The design patterns and color combinations of Kyo Komon are extremely elegant and refined. In recent years, there are more modern designs and the traditional production methods are used in small items like bags and clothes.
History
The origins of Kyo Komon are thought to date back to the creation of paper stencils about 1200 years ago with the term komon referring to the fine-pattern stencil dyeing of kamishimo worn by samurai. After the Onin War (1467-1477) during the Muromachi period (1336-1573), a wide variety of silk fabrics were produced. Centering around the area of Horikawa in Kyoto, dyers established an artisan town, and Kyo Komon gradually developed from this town. In the Sengoku period (1467-1568), both Ieyasu TOKUGAWA and Kenshin UESUGI, two of the most powerful feudal military leaders of the time, were reputed to wear Kyo Komon. When komon-dyed linen hakama trousers became a formal attire for samurai in the Edo period, it became fashionable for townspeople to wear komon kimono as well. Influenced by Kyo Yuzen, a textile from the same production center, Kyo Komon developed its unique style that is quite different from those in other komon production areas. Compared to Edo Komon, this craft has more figurative patterns and is dyed with many vivid colors. The traditional production methods are still applied, using Japanese traditional paper for making stencils and rice paste for resist dyeing.
Production Process
- 1. Pattern cutting
To make stencil paper, three or four sheets of Mino Washi (Japanese traditional paper made in the Mino region) are glued together. The different grain direction sheets of paper are glued together alternately and persimmon tannin is applied. After drying and maturing, a design is copied onto the stencil paper and is cut. A range of tiny knives or chisels are used to cut the patterns. There are four main cutting techniques, which are chosen according to the style of design; kiri bori (making little holes with an awl), tsuki bori (placing the paper on a board with a small hole and cutting over the hole), dougu bori (combining different shaped blades to make a pattern and then using the tool to cut the patterns) and shima bori (using a steel ruler and knife to cut stripe patterns). As Kyo Komon designs often include very fine patterns, much patience and skills are required in the cutting. The cut stencil is lined and reinforced with lacquered silk gauze to prevent the pattern from breaking up.
- 2. Color making
Liquid dye is added to yuzen thickening and well mixed with a rod to make a paste of the desired color. Thorough mixing is essential to ensure an even and beautiful color. No ready-made paste is ever used and the artisans blend their own colors, which is a task that requires practice and delicate adjustments.
- 3. Stenciling
A stencil is laid on plain cloth, and a resist paste or color paste is applied to the stencil using a special square spatula. The stencils used are those owned by dyers or can be custom-made originals created in consultation with the stencil makers. The patterns are repeatedly applied to a twelve meter length cloth.
- 4. Base color dyeing
There are two techniques to dye the base color. The first is applying a color paste with a spatula and the second is applying liquid dye with a brush.
- 5. Steaming and washing
After base dyeing, the fabric is steamed in a box for twenty to sixty minutes to fix the color. After removing from the steamer, the fabric is thoroughly washed in running water to remove all dye and paste residues. This step is important for the color and quality of the final piece.
- 6. Finishing
Finally, the fabric is steamed to remove wrinkles and then stretched to its correct width. On the finished fabric, the color pattern is reversed as the cut areas of the stencil have been masked with paste. The final piece is the result of the efforts of many skilled craftsmen. Even if the design and colors are the same, as each craft is made by hand, no two pieces of fabric will ever be the same.
Facility Information
Kyoto Museum of Crafts and Design
-
Address
-
Tel.+81-75-762-2670
-
ClosedDecember 29 to January 3
-
Business Hours10am to 6pm (entry until 5:30pm)
-
Website
Other Dyed textiles
- Kaga Textiles
- Kyo Yuzen Textiles
- Tokyo Fine Pattern Dyed Textiles
- Nagoya Yuzen Textiles
- Kyo Fine Pattern Dyed Textiles
- Arimatsu Narumi Tie-Dyeing
- Ryukyu Bingata Textiles
- Tokyo Yuzen Textiles
- Kyo Kanoko Tie-Dyeing
- Nagoya Black Montsuki Dyeing
- Kyo Black Montsuki Dyeing
- Naniwa Honzome Hand Dyeing
- Tokyo Honzome Chusen
- Tokyo Plain Dyeing
Other Crafts Made in Kyoto
- Nishijin Textiles
- Kyo Yuzen Textiles
- Kyo Folding Fans
- Kyo Dolls
- Kyo Fans
- Kyo Ware / Kiyomizu Ware
- Kyo Laquerware
- Kyo Braided Cords
- Kyo Fine Pattern Dyed Textiles
- Kyo Wood Joinery
- Kyo Buddhist Altars
- Kyo Embroidery
- Kyo Art Mountings
- Kyo Buddhist Altar Fittings
- Kyo Kanoko Tie-Dyeing
- Kyo Stonework
- Kyo Black Montsuki Dyeing