


- Dyed textiles
- Aichi
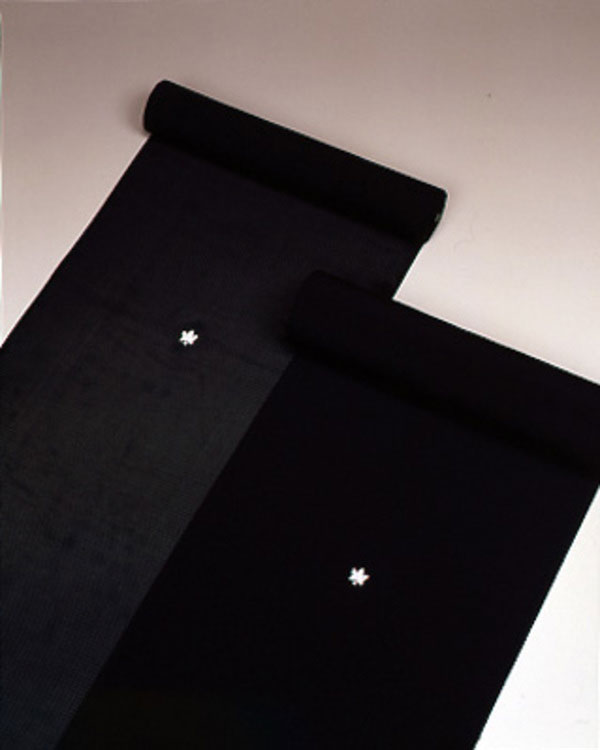
Nagoya Black Montsuki Dyeing Nagoya Kuromontsuki Zome
The luster of the jet-black dye
The beauty of the sophisticated and finest black color
Description
What is Nagoya Black Montsuki Dyeing ?
Nagoya Kuromontsuki Zome is a dyed and woven textile produced in the region surrounding Nagoya City, Aichi Prefecture. Kuromontsuki is a kimono worn at weddings or funerals and it has been popular since the Edo period (1603 - 1868) in Nagoya among the samurai and commoners. The characteristic of Nagoya Kuromontsuki Zome is the jet-black color dyed using either the hitashi zome method, which is to dye the textile using a paper pattern of a family crest, or the hiki zome method, which is to draw the family crest by hand after the textile is dyed. The hitashi zome method uses a special technique unique to Nagoya called mon ate amituke, which is placing the paper pattern of the family crest onto the woven textile and securing it with wire netting before soaking the textile in hot dye. In the hikizome method, resist paste is applied to prevent the part where the family crest should be from being dyed, and the family crest is drawn by hand afterwards.
History
The history of Nagoya Kuromontsuki Zome goes back to 1611. Shinzaemon KOSAKAI, who was the head of the dyers in the Owari domain, refined the dyeing techniques and established Kuromontsuki Zome. Initially, the technique, which was referred to as the mon-nori fuse, which was a method to apply resist paste where the family crest should be and draw the crest after the fabric is dyed, was used. However, the technique to dye using a wire mesh to secure the family crest was invented between 1830 and 1843. This technique was refined in the Meiji period (1868 – 1912) and it became a technique which is almost the same as the one currently used. It is recorded in the Owari/Noshu Konya Socho (the book of dyers in Aichi Prefecture/Gifu Prefecture today), which was published in 1848, that there were about 1,260 craftsmen for Nagoya Kuromotsuki Zome between 1818 and 1829.
Production Process
- 1. Preparation for dyeing Impurities are to be removed from the white fabric in order to dye the black evenly. When all the impurities are removed from the fabric, the body parts of the kimono including the sleeves and collar and the position of a family crest are decided and marked accordingly.
- 2. Pasting the family crest pattern The pattern of the family crest made with cardboard is pasted on both sides of the fabric at the marked position.
- 3. Attaching metal mesh over the patterns The cardboard family crest patterns are pasted on both sides of the fabric and a metal mesh made of brass with a diameter of approximately 5 centimeters is placed over the patterns. The mesh is fastened with a string to prevent the patterns from coming out of place.
- 4. Preliminary dyeing The fabric is soaked in water to prevent the dye from permeating the cardboard patterns. Then, the preliminary dyeing starts. First, the dye is selected from the two kinds of dye. One is the benishita and the other is the aishita. The benishita is used mainly for women’s kimono or for the people in the Kansai region who prefer this method. The aishita is used for men’s kimono or for the people in the Kanto region who prefer this method. The texture after dyeing is slightly different depending on the method used. When the dye has been decided, it is dissolved in hot water (80 – 90C) in a tub, and the fabric is soaked in the dye. The fabric should be left in the dye for 10 to 15 minutes. The tub needs to be shaken from time to time to prevent uneven dyeing.
- 5. Black dyeing There are two kinds of techniques for the black dyeing. One is kuro hitashi zome which is dipping the fabric in dye, and the other is kuro hikizome which is brush dyeing. For the hitashi zome, the black dye is dissolved in hot water (90 – 95C) in a dye tub and the fabric that has already been preliminarily dyed is soaked in the tub. The fabric is left in the tub for 30 to 40 minutes and the tub is shaken from time to time to prevent unevenness in the dye. After that, the fabric is left in the tub overnight before it is taken out. The wire mesh and the patterns are removed, and the fabric is washed carefully to remove excess dye. The fabric is then dried naturally.
- 6. Drawing the family crest The family crest is drawn in its position, where it was protected by the wire mesh and pattern and left white. An experienced craftsman draws the family crest by hand using high quality ink with less glue that contains animal organic protein, an extra-fine brush, a protractor and a ruler. The family crest does not come off even after dry-cleaning, and if it becomes soiled, it can be cleaned as new by washing carefully.
Other Dyed textiles
- Kaga Textiles
- Kyo Yuzen Textiles
- Tokyo Fine Pattern Dyed Textiles
- Nagoya Yuzen Textiles
- Kyo Fine Pattern Dyed Textiles
- Arimatsu Narumi Tie-Dyeing
- Ryukyu Bingata Textiles
- Tokyo Yuzen Textiles
- Kyo Kanoko Tie-Dyeing
- Nagoya Black Montsuki Dyeing
- Kyo Black Montsuki Dyeing
- Naniwa Honzome Hand Dyeing
- Tokyo Honzome Chusen
- Tokyo Plain Dyeing
Other Crafts Made in Aichi
- Tokoname Ware
- Akazu Ware
- Toyohashi Brushes
- Nagoya Yuzen Textiles
- Nagoya Buddhist Altars
- Owari Cloisonné
- Arimatsu Narumi Tie-Dyeing
- Mikawa Buddhist Altars
- Seto Underglazed Ceramics
- Nagoya Black Montsuki Dyeing
- Nagoya Paulownia Chests
- Okazaki Stonework
- Nagoya Festival Dolls and Decorations
- Owari Buddhist Altar Fittings
- Sanshu Onigawara Crafts