- Lacquerware
- Fukui
Wakasa lacquerware Wakasa nuri
High quality lacquerware
Reflects each artisan's individuality
Description
What is Wakasa lacquerware ?
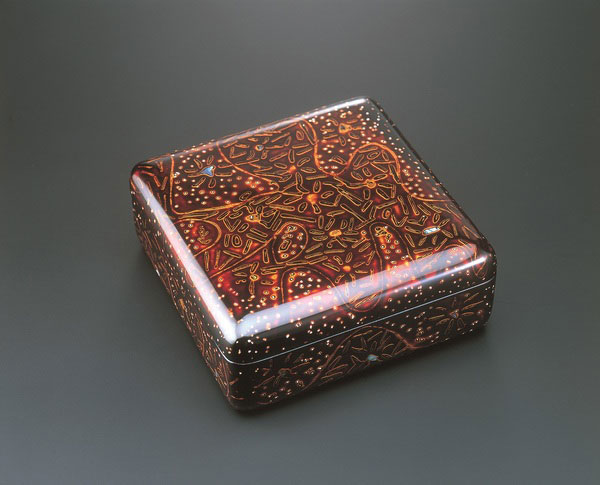
Wakasa lacquerware (called Wakasa-nuri in Japanese) is produced in the area around the city of Obama, Fukui prefecture. It is said to have originated in the early Edo period (1603-1868) when a craftsman serving the Obama domain (now the city of Obama), which controlled the region near Wakasa Bay, created a design depicting the beautiful depths of the sea. Wakasa Bay is a picturesque area because as a ria coast made up of numerous small bays. A few of these locations are Amanohashidate, one of the Three Most Scenic Spots of Japan, and Kehi no Matsubara, one of the Three Most Scenic Pine Groves of Japan.
The defining elements of Wakasa lacquerware are the creation of patterns with eggshells, seashells, and pine needles and the use of the togidashi maki-e, a technique which is elevation of the pattern through applying multiple layers of lacquer. These features give this craft a unique and composed appearance. It is also prized artistically, unlike various other types of lacquerware that are more appreciated for functionality only.
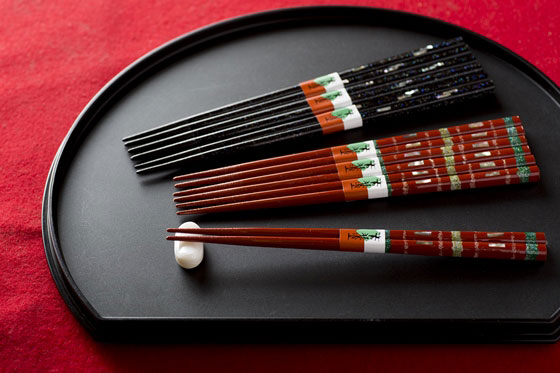
Wakasa lacquerware is popular for daily use due to its durability against heat and water, with the chopsticks accounting for more than eighty percent of the lacquer chopsticks produced domestically. Another appealing aspect is that the entire production process is completed by a single craftsman, giving individuality for each piece.
History

Wakasa lacquerware is said to have started around the years 1596 to 1615, when Sanjuro MATSUURA, a lacquer craftsman working for the Obama domain, designed and produced a lacquerware pattern based on the seabed of Wakasa Bay, using Chinese lacquerware as a reference. The improved version of this original prototype was called Kikuji lacquerware, from which Matsuura's disciples invented the isokusa lacquerware technique. The techniques that are being passed down to this day were perfected between 1658 and 1660. The lord of the Obama domain then named the craft, Wakasa lacquerware, and actively promoted production as a side job among lower class samurai, ashigaru.
Due to the support from a successive generation of lords, the production of this craft grew to a core industry that supported the economy of the domain. Numerous outstanding craftsmen emerged, leading to various new beautiful designs. The middle to late Edo period (1603-1868) is said to have been the golden age of Wakasa lacquerware, though it remained popular as a local specialty of the region even after the Meiji period (1868-1912). Today, craftsmen are researching ways to create new designs that will suit modern trends.
General Production Process

- 1. Cloth pasting
There are over sixty steps in the Wakasa lacquerware production process, which can be broadly divided into a few general steps. The process, excluding the first step of wood base making, will be done by one person. Sturdy wood from trees like Japanese zelkova, Japanese horse chestnut, magnolia, chestnut, cherry, and Japanese cherry birch is used for the wood base. When choosing the wood, it is important to double check for any warping. After drying the selected wood for an appropriate amount of time, it is cut to the exact shape and size required for the piece.
Cloth and Japanese traditional paper is pasted onto joints and cracks of the wood base for strengthening and to cover up any holes. This process, called cloth pasting, must be done carefully in order to prevent the wood from cracking or warping.
- 2. Undercoating
The next process is undercoating. Filtered raw lacquer, clay powder, and glue are mixed well and applied evenly over the entire surface of the wood base with a brush. Rust lacquer, a mixture of powder pebbels and raw lacquer, are neatly applied using a spatula. While the undercoat will not be visible once the item is completed, it is still an important layer that will greatly influence the beauty of the final product.
- 3. Intermediate coating
After the undercoat has dried, it is time for rust polishing which is the process of polishing and sanding the wood base using a whetstone and water. An intermediate coat of lacquer is applied afterwards to prevent the decorative lacquer from being absorbed by the polishing powder during the next step.
- 4. Creating patterns
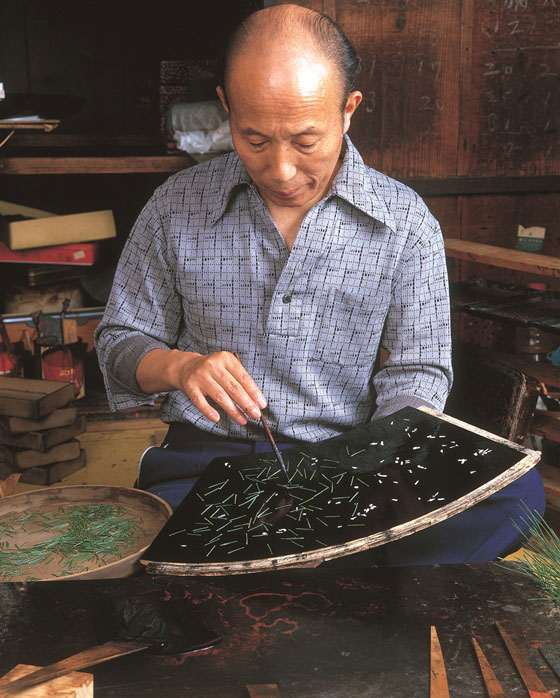
Patterns are created by sprinkling various natural materials such as eggshells, seashells, mother-of-pearl, and rice husks on top of the intermediate coating. The patterns must be created before the lacquer dries, but they will not turn out well if the lacquer dries too quickly either. As the rate of drying is the most ideal in winter, patterns are created between December and March.
- 5. Mixed coating
Coating and polishing are done numerous times once the patterns are complete. Mixed coating refers to coating of two or more different colors of colored lacquer on top of one another, creating uniqueness, luster and colors.
- 6. Gold leaf placement
Gold leaf is placed over the mixed coating, adding an elegant and beautiful glow to the patterns.
- 7. Heavy coating
The item is coated with many layers of lacquer and polished to gradually bring the patterns to the surface.
- 8. Stone polishing
The article is polished in sequence, starting by using the roughest whetstone (such as coarse whetstones) and progressively changing to finer ones (such as medium whetstones, followed by finishing whetstones), until the patterns are clearly visible. Stone polishing is a process unique to Wakasa lacquerware as other types of lacquerware do not use this technique.
- 9. Charcoal polishing
After stone polishing, the item is coated with glossy lacquer and touch up lacquer. It is then polished and smoothed using coarse and medium charcoal made from magnolia, followed by soft charcoal made from koda tree and crepe myrtle.
- 10. Polishing
Oil polishing powder, a mixture of polishing powder and canola oil, is applied onto a piece of cloth and used to rub and polish the surface of the piece. Next, floss silk soaked in raw lacquer is used to polish the surface further. The final step involves applying canola oil and natural red oxide on the fingers and polishing in circular motions, then the lacquerware is finally complete.
Where to Buy & More Information
Fukui Ceramics Center
-
Address
-
Tel.+81-776-41-3611
-
ClosedAround the New Year
-
Business Hours9am to 5pm
-
Website
See more Lacquerware
- Wajima lacquerware
- Kamakura-bori lacquerware
- Tsugaru lacquerware
- Aizu lacquerware
- Yamanaka lacquerware
- Kawatsura lacquerware
- Echizen lacquerware
- Joboji lacquerware
- Kiso lacquerware
- Hidehira lacquerware
- Kagawa lacquerware
- Ryukyu lacquerware
- Takaoka lacquerware
- Wakasa lacquerware
- Hida-shunkei lacquerware
- Ouchi lacquerware
- Kanazawa lacquerware
- Kishu lacquerware
- Kyo laquerware
- Odawara lacquerware
- Naruko lacquerware
- Niigata lacquerware
- Murakami carved lacquerware


