


- Other crafts
- Hyogo
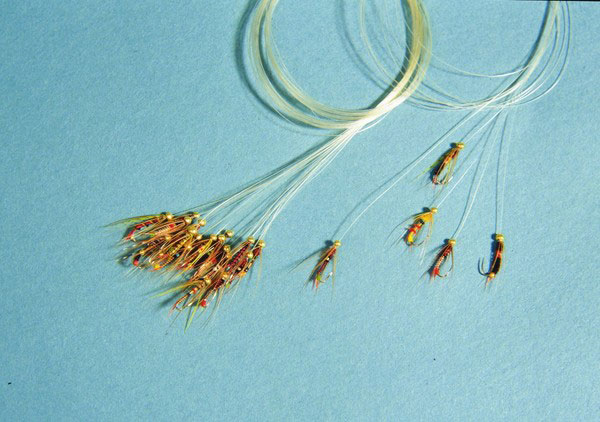
Banshu Fishing Flies Banshu Kebari
Tiny works of art on the wing
Feather, gold leaf and lacquer
Description
What is Banshu Fishing Flies ?
Banshu Kebari are fishing flies used as artificial-bait hooks for fishing, produced in Nishiwaki City, Hyogo Prefecture. They are characterized by their exquisitely fine workmanship; bird feathers wound with silk thread around a small 1cm hook, adorned with gold leaf and urushi lacquer become brilliant fleeting flies to catch fish.Banshu Kebari are mainly for catching sweetfish, and fishermen can choose from many different types of fishing flies depending on the season, weather, or time of day. A variety of designs are also produced for other types of fish, and to meet natural conditions such as differing depths and water conditions. It is said that there are more than 500 different types of fishing flies.
History
Fishing flies likely to be the origin of those made today are mentioned in a Kyoto guide titled “Kyo Suzume Ato-oi” printed in 1678 in the early Edo period, and it is said that an artisan called Iemon was making fishing flies at that time. Moreover, in a geographical description and sightseeing brochure called Kyo Habutae published in 1685, we find a description of a “fishing-fly head,” which lets us know that Iemon was producing fishing flies as products. In the late Edo period, the production techniques were introduced to the Banshu region (present-day Hyogo Prefecture) from Kyoto, where fly-fishing for sweetfish had been popular since the Genroku era (1688-1704). In those days farmers produced fishing flies as a sideline. By the middle of the Meiji period (1868-1912), fishing fly techniques became so artful that fishermen were catching a remarkable number of fish; in consequence they repeatedly received awards at Marine Product Fairs or other exhibitions, helping publicize the good quality of Banshu Kebari among many fishermen.
Production Process
- 1. Base lacquering Lacquer mixed with red pigment called red lead primer and polishing powder is applied on the 5 mm body of the hook with a paintbrush. It is then inserted into a special comb and left to dry.
- 2. Pasting gold leaf After the lacquer has dried, the hook is removed from the comb. Tweezers are used to place gold leaf on the body section; while rotating the hook, the gold leaf is pasted using a small bird feather or calligraphy brush.
- 3. Attaching a small lacquer ball Lacquer, red lead primer, and polishing powder are mixed until quite hard and a blob is attached first to the tip of a tatami needle. Using this, a ball with a diameter of about 1 mm is then shaped and is placed at the end of the base lacquered hook. The hook is inserted into a special comb to dry.
- 4. Pasting gold leaf on the lacquer ball A gold leaf sheet is cut into 5 mm squares and with tweezers one tiny gold leaf square is placed onto the lacquer ball. Using a small bird feather or calligraphy brush, the gold leaf is pasted, while the hook is rotated to shake off any excess gold leaf.
- 5. Attaching coarse silk thread The hook is naturally dried for more than 30 days and it is then inserted in a hand-held holder. Centering on the barb of the hook back, about 33 mm of coarse silk thread is closely wound on the upper and lower parts 3 times each to a length of 1 mm or so.
- 6. Attaching synthetic fiber thread A 33 mm length synthetic fiber thread (usually nylon) is placed along the hook, and the silk thread is tightly wound 3 times up to the barb. A 5 mm tip of the nylon thread is bent toward the barb; the silk thread is then wound about 6 times around the nylon thread to firmly secure it on the hook.
- 7. Winding the feathers The hook is held between the index finger and thumb, and one long barb from a chicken tail feather is laid above the hook end, which represents the rear end of the fly; the feather barb is closely wound about 7 times from the lower part of the inside toward the upper part of the outside, making sure that he posterior barbules are always facing the outside.
- 8. Attaching the tails To fill out the whole shape of the fly, firstly a sparrow wing primary feather is used for the tails of the fly.
- 9. Wrapping the body Several fine bird feathers are wrapped around one by one. There are five methods of wrapping the body, including a loose spaced winding method and a tight close winding method.
- 10. Attaching body feathers Using a feather from the lower back of a Nagoya Cochin (a type of chicken), 6 feather barbs are placed to surround the whole hook and are attached to form the body.
- 11. Attaching a lacquer ball A firm mix of lacquer and red lead primer is attached to the tip of a tatami needle, and while rotating the hook, the head section of the fly is shaped as a ball with a pointed tip representing the top of the head. The hook is then inserted into a special comb and left to dry.
- 12. Pasting gold leaf on the lacquer ball A gold leaf sheet is cut into rectangles each measuring 10 mm × 5 mm, and tweezers are used to place the rectangular sheet on the lacquer ball. Using a small bird feather, the gold leaf is pasted, while the nylon thread is rotated to shake off any excess gold leaf, and the Banshu Kebari is completed.
Facility Information
Nishiwaki Kyodo Shiryokan
-
Address
-
Tel.+81-795-23-5992
-
ClosedMondays (open if Monday is holiday and closed the next day) and December 29 to January 3
-
Business Hours9am to 5pm
-
Website
Other Other crafts
- Edo Kiriko Cut Glass
- Koshu Lacquered Deer Leather
- Kyo Folding Fans
- Marugame Fans
- Boshu Fans
- Gifu Lanterns
- Yamaga Lanterns
- Kyo Fans
- Tendo Japanese Chess Pieces
- Edo Glass
- Edo Patterned Paper
- Yame Lanterns
- Owari Cloisonné
- Fukuyama Koto (Japanese Harps)
- Kyo Art Mountings
- Banshu Fishing Flies
- Edo Woodblock Prints
- Koshu Hand-carved Seals
- Edo Hyogu (Art Mountings)
- Edo Tortoiseshell Crafts
- Etchu Fukuoka Sedge Hats
- Izumi Glass
- Nagasaki Tortoiseshell Crafts
- Sanshin
- Tokyo Hand-carved Seals
- Tokyo Koto (Japanese Harp)
- Tokyo Shamisen