


- Other crafts
- Tokyo
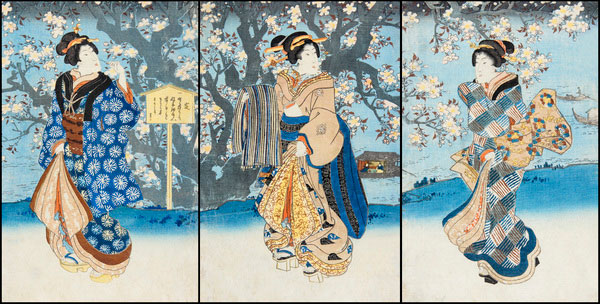
Edo Woodblock Prints Edo Mokuhanga
Edo's popular culture
seen through bright color prints
Description
What is Edo Woodblock Prints ?
Techniques for woodblock prints were developed and refined during the Edo period (1603-1868), and Edo Woodblock Prints called Edo Mokuhanga in Japanese, contributed to spreading beautiful printed art forms such as ukiyoe (a genre of Japanese art). Edo is Tokyo's former name. The production process of Edo Woodblock Prints usually requires an artist, a wood carver, and a printer to jointly create one piece of work for a publisher. Regular paintings often use pigment colors while the Edo Woodblock Prints use a combination of fiber colors of Japanese traditional paper (washi) and pigment colors. The wooden blocks are mainly made of hard cherry wood as it has a fine grain ideal for carving details and it is durable enough for printing hundreds of copies of prints. The paper used is a handmade fine quality Japanese paper made from the bark of a paper mulberry tree called kizuki hosho because it has a soft thick texture, but is strong enough to withstand multi color printing, making it ideal for woodblock printing.
History
It is said that the techniques and skills of Edo Woodblock Prints were established in the late Edo period (1603-1868). Simple woodblock printing already existed since the Asuka period (592-710), but they were not developed to the current form of woodblock prints until the late Heian period (794-1192). At first, a technique of monochrome printing using only black ink called sumizuri-e were used to print mainly Buddha figures. However, the prints that were mainly for religious use started to be used for comical novels or commercial news flyers which were popular amusements for the general public in the Edo period. Around 1744, woodblock printing techniques further improved as a new technique adding red or green highlights to the black and white print called benizuri-e emerged. This was the first step towards multi-color printing. However, there were problems in developing the techniques to prevent the misalignment of woodblocks, and using the two colors red and green was the limit for multi-color printing. It was in 1764 that the multi-colored printing technique was finally established by Jinshiro OKUBO and Sanemon KOMATSUYA. Multi-colored prints called nishiki-e became popular in the following year, and with remarkable work done by Harunobu SUZUKI who is regarded as the founder of nishiki-e, demands for nishiki-e increased. Finally, multi-color woodblock printing became a significant part of the mass culture of Edo and many artists started to produce woodblock prints.
Production Process
- 1. Original drawing The original drawing, which is the draft of the completed woodblock print, is drawn. At this stage, it is only drawn in black and white without any colors. Nowadays, the original drawings may be created based on illustrations, photographs, or using computer graphics.
- 2. Preparation for carving blocks Three types of woodblocks are made during this process: an outline block, a black ink block and color blocks. A block is necessary for each color. For example, when five colors are used in the original drawing, five woodblocks need to be carved. A cherry wood block is planed smoothly then carefully and evenly coated with rice glue. It is essential to have an absolutely even layer of glue in preparation for pasting the original drawing which is faced down and pasted onto the wood block. Since the block is carved based on the pasted original drawing, the drawing is carefully and firmly pressed with palms to prevent any wrinkling before the glue dries. When the drawing lines rise to the surface, the preparation is complete. To raise the original drawing lines, camellia oil is sometimes rubbed on the surface.
- 3. Outline block The outline block is carved. The block is carved out from the pasted original drawing using more than 10 types of carving knives and chisels. All the wood around the lines is cut away to make outlines and to prevent pigments from smudging. When the block is finished, marks are carved in the center toward the carver and in the corner on the right side, and then the paper is removed. This mark acts as a guide and prevents any misalignment of blocks in later work. A trial print is made and any misalignments or uncarved parts are corrected.
- 4. Printing of test copies Black ink is applied to the outline block to print test copies. These test copies will be printed for each color. For example, five copies will be made if there are five colors used. This work is a vital part of the block making process as it creates the outlines of the picture and will be the foundation for the following stages.
- 5. Specifying colors and carving color blocks The artist specifies the colors by checking with the test copies. Once the colors are specified, color blocks are carved in the same way as the outline block based on the marks carved on the outline block.
- 6. Dampening Before starting the printing, Japanese traditional paper washi is dampened with water. It is difficult to apply colors if the paper is dry, so this is an essential part of printing. This task may seem simple but it requires high craftsmanship with a lot of expertise as coloration varies depends on the degree of dampness.
- 7. Printing Color pigments are applied to the block and a piece of Japanese traditional paper (washi) is carefully set upon it. It is then printed using a hand rubbing pad. This proof print is made to check whether the colors match with those specified by the artist. If there is no problem, it can be passed on to the final printing. If the color is different, the color must be adjusted. This process is done for all of the colors. When all color blocks have been printed, the work is finished. In the printing process, techniques such as shading, drawing outlines or solidifying single colors are used to give great effects.
Other Other crafts
- Edo Kiriko Cut Glass
- Koshu Lacquered Deer Leather
- Kyo Folding Fans
- Marugame Fans
- Boshu Fans
- Gifu Lanterns
- Yamaga Lanterns
- Kyo Fans
- Tendo Japanese Chess Pieces
- Edo Glass
- Edo Patterned Paper
- Yame Lanterns
- Owari Cloisonné
- Fukuyama Koto (Japanese Harps)
- Kyo Art Mountings
- Banshu Fishing Flies
- Edo Woodblock Prints
- Koshu Hand-carved Seals
- Edo Hyogu (Art Mountings)
- Edo Tortoiseshell Crafts
- Etchu Fukuoka Sedge Hats
- Izumi Glass
- Nagasaki Tortoiseshell Crafts
- Sanshin
- Tokyo Hand-carved Seals
- Tokyo Koto (Japanese Harp)
- Tokyo Shamisen
Other Crafts Made in Tokyo
- Edo Kiriko Cut Glass
- Edo Wood Joinery
- Edo Glass
- Murayama Oshima Tsumugi Textiles
- Tokyo Silverwork
- Edo Patterned Paper
- Tokyo Fine Pattern Dyed Textiles
- Edo Bamboo Fishing Rods
- Tama Textiles
- Honba Kihachijo Fabric
- Edo Woodblock Prints
- Tokyo Yuzen Textiles
- Edo Seasonal Festival Dolls
- Edo Hyogu (Art Mountings)
- Edo Oshi-e Embossed Fabric Pictures
- Edo Tortoiseshell Crafts
- Tokyo Antimony Crafts
- Tokyo Hand-carved Seals
- Tokyo Honzome Chusen
- Tokyo Koto (Japanese Harp)
- Tokyo Plain Dyeing
- Tokyo Shamisen