


 Photo:Niigata Prefecture
- Woven textiles
- Niigata
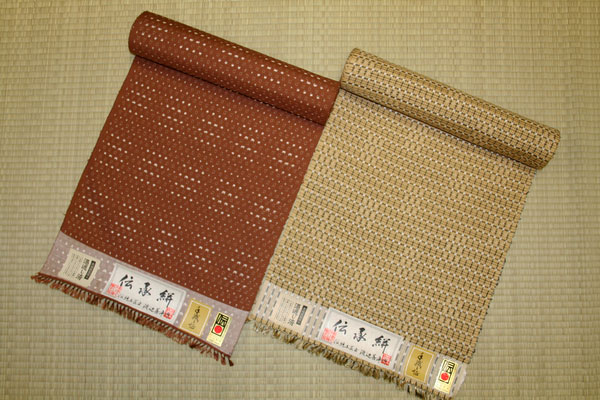
Tokamachi traditional resist-dyed textiles Tokamachi gasuri
Distinctive grace of woven silk and delicate patterns
Folk craft fabric mixing traditional beauty and a modern style
Description
What is Tokamachi traditional resist-dyed textiles ?
Tokamachi Gasuri is a fabric produced in Tokamachi City and around Tsunanmachi in Nakauonuma, Niigata Prefecture. This area has heavy snow in the winter and is in a basin, so the climate and geographical features are all suitable for fabric production. Another famous fabric called Tokamachi Akashi Chijimi is also produced here, so the area is well known as a successful fabric producing area. The weaving techniques of kasuri (splashed patterns) used to produce Tokamachi Gasuri and Tokamachi Akashi Chijimi are the same, but the method of nenshi which involves twisting the threads together is different. This nenshi method creates a difference in the texture and the strength of the woven fabric. The characteristic of Tokamachi Gasuri is the lustrous texture of silk fabric with the patterns of tategasuri (vertical splashed patterns) and yokogasuri (horizontal splashed patterns). The luster and the texture of silk are distinctive in this fabric, and with the traditional, beautiful kasuri patterns and a modern style combined, Tokamachi Gasuri are cherished as a kimono for outings as well as for regular use at home.
History
It is said that the resist yarn dyeing techniques for Echigo Chijimi, a hemp fabric mainly produced around Ojiya, Niigata prefecture, already existed in the early 18th century. As the area around Tokamachi and Uonuma region is famous for its heavy snow, the humidity is high, and with its geographical features of being in a basin, there are no strong winds throughout the year. For this reason, ramie, material for hemp fabric, was produced to a great extent since the Asuka period (592 - 710). The development of the technique to spread fabric on snow called yukizarashi, enabled production of high quality fabrics, leading to the production of silk textiles later on. In the Edo period (1603 - 1867), the whole Tokamachi area became famous as a production area for Echigo Chijimi, and the fabric was used to make single-layer kimonos and ceremonial samurai costumes. In the late 19th century, Akashi Chijimi, a high quality silk fabric for use in the summer, became a nationwide standard. Kasuri weaving further developed and started to be used in silk textiles. In the Meiji period (1868 - 1912), various resist yarn dyeing techniques for kasuri were developed, and kasuri became even more popular. Even after World War II, Tokamachi Gasuri and Tokamachi Akashi Chijimi are the two famous fabrics that support Tokamachi as the "Town of Silk Textiles."
General Production Process
- 1. Planning (Making the kasuri pattern drawing and ruler)
A kasuri pattern drawing is prepared. The kasuri pattern drawing is based on the original pattern drawing or sample. The positions of the kasuri pattern are decided and marked on graph paper. Then, the pattern drawing is divided into tategasuri (vertical splashed patterns) and yokogasuri (horizontal splashed patterns) and the kasuri rulers for tategasuri and yokogasuri are made respectively.
- 2. Twisting threads and refining
Raw silk and dupion raw silk are set in the twisting machine. Dupion raw silk is thick with many knots so it is also called fushi-ito, meaning knotted thread. The strength and thickness of the threads are made even by putting the raw silk through the twisting machine. After that, the threads are refined by boiling in hot water to remove sericin from the surface of the fabric.
- 3. Stretching by hand
After twisting the threads and refining, the threads are starched before being wound around a bobbin or a frame. Then, the required number of threads and length are sorted based on the pattern drawing.
- 4. Marking and tying the threads
The threads for tatekasuri and yokokasuri are each set on a stand to stretch the threads, and the positions of each kasuri pattern are marked on the threads using the kasuri rulers. The marked parts are tied firmly with cotton thread or flat rubber to prevent those parts from being dyed. If the tying is too weak or in the wrong position, the threads will not be dyed properly and the patterns will not come out as planned.
- 5. Rubbing dye into threads
Dye is rubbed into the marked places thoroughly using the spatula for rubbing. Then the threads are gathered and wound into a skein. The threads are then kneaded in dye repeatedly together with the threads for the base fabric that don't have kasuri patterns. After that, the dyed threads are steamed at 100℃ to settle the color before they are starched, which makes winding the threads and weaving easier.
- 6. Preparations for weaving
The warp threads and the weft threads are prepared separately. The cotton threads or the flat rubber that were tied to the warp threads are removed and the threads are loosened. Next the threads are wound around the omaki that delivers the threads. Then, the threads are threaded through the heddle. The heddle used here is an arrangement of wires like a comb in a square frame and the threads are threaded through the little hole in each wire . The threads put through the little holes are put through the reed where the warp threads go through when weaving, two at a time. The number of threads used here is approximately 1200 on average. This series of tasks has to be done carefully in order to weave the kasuri pattern precisely to the plan. The weft threads, in the meantime, are wound around the pulling frame after unfastening and loosening them. Then, each of the weft threads is draped on a different frame for threads and wound into a skein. The weft threads are wound around a spool for weaving. This is the end of the preparations for weaving.
- 7. Weaving
As the threads were put through the heddle and reed in the preparation process, the threads move up and down and make room for the weft threads to be put through. The weft threads go back and forth sideways, sandwiched by the warp threads. The fabric is woven by repeating this movement of threads. The edges marked during the marking process have to be matched and adjusted now and then to make sure the positions of the pattern are correct. When the fabric is woven, an inspection is done to check for stains and unevenness or flaws in the weaving. The fabric is completed when it passes the inspection.
Where to Buy & More Information
Michi no Eki Cross Ten
-
Address
-
Tel.+81-25-757-2323
-
Closed2nd Wednesdays and December 31
-
Business Hours9am to 6pm (Nov - Mar: 9am to 5:30pm)
-
Website
See more Woven textiles
- Nishijin brocade
- Yuki tsumugi silk
- Kurume traditional resist-dyed textiles
- Ojiya chijimi textiles
- Hakata brocade
- Ushikubi tsumugi silk
- Chichibu-meisen silk
- Miyako ramie textile
- Shiozawa tsumugi silk
- Kumejima tsumugi silk
- Omi ramie cloth
- Ryukyu traditional resist-dyed textiles
- Kiryu brocade
- Murayama-oshima tsumugi silk
- Yumihama traditional resist-dyed textiles
- Chibana-hanaori textiles
- Hon-shiozawa silk
- Oitama tsumugi silk
- Ojiya tsumugi silk
- Yaeyama cotton cloth
- Yaeyama ramie cloth
- Honba oshima tsumugi silk
- Shinshu tsumugi silk
- Shuri brocade
- Tama brocade
- Yomitanzan-hanaori textiles
- Isesaki traditional resist-dyed textiles
- Hachio island silk
- Nibutani bark cloth
- Uetsu tilia bark cloth
- Awa-shijira cotton cloth
- Kijoka banana fiber cloth
- Tokamachi traditional resist-dyed textiles
- Tokamachi akashi chijimi textiles
- Yonaguni brocade
- Yuntanza minsa
- Flower pattern textiles
- Oku-Aizu Showa Karamushi Textiles
See items made in Niigata
- Ojiya chijimi textiles
- Shiozawa tsumugi silk
- Hon-shiozawa silk
- Ojiya tsumugi silk
- Niigata lacquerware
- Kamo traditional chest
- Murakami carved lacquerware
- Tsubame-tsuiki copperware
- Echigo-sanjo cutlery
- Tokamachi traditional resist-dyed textiles
- Nagaoka Buddhist altar
- Tokamachi akashi chijimi textiles
- Echigo-yoita cutlery
- Sanjo Buddhist altar
- Niigata-shirone Buddhist altar